Thursday, 30 May 2024

OBDSTAR X300 Classic G3 Manual: Screen Recording

This article will guide you on how to use OBDSTAR X300 Classic G3 to record screens.


Procedure:


Step 1. Open the hidden menu at the bottom of the desktop and select [Screen Recording]. Or you can swipe down from the top of any interface to expand the drop-down box, then swipe down again to expand the first column and select [Screen Recording].

obdstar-x300-classic-g3-manual-screen-recording-1

Step 2. After tapping [START] in the pop-up box, a countdown will be displayed in the lower right corner and a beep will sound after three seconds, indicating that recording has started.

obdstar-x300-classic-g3-manual-screen-recording-2

Step 3. When you want to end recording, tap the red icon in the bottom right corner and the hidden menu at the top of the screen will open automatically, tap [Stop Screen Recording] to end recording.

obdstar-x300-classic-g3-manual-screen-recording-3

For more information about OBDSTAR X300 Classic G3 please follow www.obd2shop.co.uk

Monday, 27 May 2024

OBDSTAR X300 Classic G3 Manual: Transfer Files Using USB Flash Drive

This post will guide you on how to transfer files using a USB flash drive on your OBDSTAR X300 Classic G3 Key Programmer.

Procedure:

Step 1. Insert the USB flash drive into the USB port of your device.

Step 2. Expand the hidden menu at the bottom of the desktop and select [ES File Explorer] to open it. In the left menu, select [Local] > [Home]. The block under the Internal Storage block is for USB storage.

obdstar-x300-classic-g3-transfer-files-using-usb-flash-drive-1

Step 3. Open [Internal Storage], select any folder (or open the folder to select files) and hold. An empty circle will appear under each file, and function buttons such as copy, cut, delete, and rename will appear at the bottom right. Select the folder (or file) you want to transfer, the circle under the selected folder will be marked with a checkmark and turn green, then tap [Copy].

obdstar-x300-classic-g3-transfer-files-using-usb-flash-drive-2

Step 4. Go back to the Home tab, then select the storage for the USB you inserted.

obdstar-x300-classic-g3-transfer-files-using-usb-flash-drive-3

Step 5. Open the [Usb Storage] folder and all the folders in the USB drive will be displayed (See example below). Paste the copied folder (or file) to the desired location.

obdstar-x300-classic-g3-transfer-files-using-usb-flash-drive-4

Step 6. After everything is done, just pull out the USB flash drive.

For more information about OBDSTAR X300 Classic G3 please follow www.obd2shop.co.uk

Friday, 10 May 2024

Alfa Romeo Stelvio Instrument ECU Unlock via OBDSTAR X300 Classic G3

This post will guide you on unlocking the used instrument ECU for Alfa Romeo Stelvio using the OBDSTAR X300 Classic G3 key programmer.


The tools we need:

Alfa Romeo Stelvio Instrument

X300 Classic G3

P004 Adapter

Main Cable

P004 ECU Clone Jumper

alfa-romeo-instrument-unlock-via-x300-classic-g3-1

Procedure:

First, we select [ECU Advanced] >> [FIAT/ALFARMEO] >> [FIAT/ALFARMEO V30.04] >> [ALFARMEO] >> [IPC]

alfa-romeo-instrument-unlock-via-x300-classic-g3-2

alfa-romeo-instrument-unlock-via-x300-classic-g3-3

alfa-romeo-instrument-unlock-via-x300-classic-g3-4

alfa-romeo-instrument-unlock-via-x300-classic-g3-5

Click [Guide] in the lower left corner of the X300 Classic G3 tablet, and carefully read the development background and operation methods.

Then click [Back] to return to the previous interface, and select [ECU information] to view the information, we can see that ECU is locked here.

Then we select [ECU Unlock] to unlock.

alfa-romeo-instrument-unlock-via-x300-classic-g3-6

alfa-romeo-instrument-unlock-via-x300-classic-g3-7

alfa-romeo-instrument-unlock-via-x300-classic-g3-8

Information:

This function is available by connecting the server, please ensure the internet connection is normal.


We click "OK" to continue.


The instrument light turns on and the ECU unlocked successfully.

alfa-romeo-instrument-unlock-via-x300-classic-g3-9

alfa-romeo-instrument-unlock-via-x300-classic-g3-10

Video Guides:

www.obd2shop.co.uk

Tuesday, 7 May 2024

How to register and update OBDSTAR X300 Classic G3

This post will guide you on how to register and update your OBDSTAR X300 Classic G3 Programmer.


Connect the power supply, connect to the network.

register-and-update-x300-classic-g3-1

Select [DP] in the lower left corner of the tablet, and select [Personal Center] to enter the user login page.

register-and-update-x300-classic-g3-2

register-and-update-x300-classic-g3-3

Select [Register] to fill in relevant information.

register-and-update-x300-classic-g3-4

register-and-update-x300-classic-g3-5

register-and-update-x300-classic-g3-6

Registration is successful, select [Login now!].

register-and-update-x300-classic-g3-7

Enter your user name and password to login.

Then return to the previous interface and select [Upgrade] to update the software.

register-and-update-x300-classic-g3-8

register-and-update-x300-classic-g3-9

register-and-update-x300-classic-g3-10

Done!

Video guides:

www.obd2shop.co.uk


Sunday, 21 April 2024

OBDSTAR X300 Classic G3 Chery Tiggo 8 Pro Proximity Key Programming

This post will guide you on how to use OBDSTAR X300 Classic G3 to do Chery Tiggo 8 Pro proximity key programming.


The tools we need:

X300 Classic G3

M001 Main Cable

New Key

obdstar-g3-chery-tiggo-8-pro-proximity-key-programming-1

Procedure:

Connect OBDSTAR X300 Classic G3 to the car through M001 Main Cable

Select [IMMO], enter "Chery" to search, and select [CHERY/COWIN/JETOUR/EXEED]>>[Manual Select Model]>>[TIGGO]>>[TIGGO 8 PRO]>>[PROXIMITY]


Step 1. Read PinCode

Choose [Read PinCode]

obdstar-g3-chery-tiggo-8-pro-proximity-key-programming-2

obdstar-g3-chery-tiggo-8-pro-proximity-key-programming-3

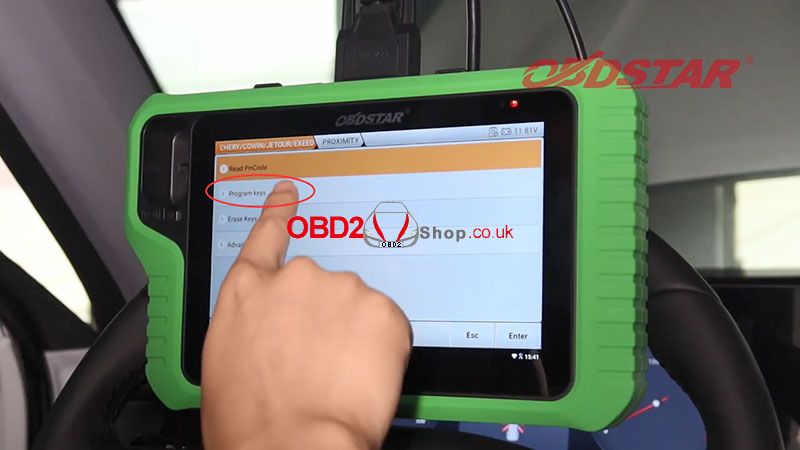
Step 2. Program keys

Choose [Program keys]>>[Program new keys]

obdstar-g3-chery-tiggo-8-pro-proximity-key-programming-4

obdstar-g3-chery-tiggo-8-pro-proximity-key-programming-5

Information:

If it is a blade key please insert it into the keyhole;

If it is a proximity key. Please put the key to be matched in the sensing area and take the other keys out of the vehicle

The sensing area may be located at:

1. Cup holder (some models require moving the cup holder away)

2. Below the cigarette lighter or USB port

3. Near the gear lever


Put the key matched in the sensing area, and input the PinCode just read.

obdstar-g3-chery-tiggo-8-pro-proximity-key-programming-6

obdstar-g3-chery-tiggo-8-pro-proximity-key-programming-7

End of function execution!


The proximity key programming is completed.

obdstar-g3-chery-tiggo-8-pro-proximity-key-programming-8

Video Guides:


www.obd2shop.co.uk

Wednesday, 17 April 2024

OBDSTAR MT502 Performs Land Rover Knob Gear Lever Action Test

This post will show you how to use the OBDSTAR MT502 Automotive Compressor Test Platform to do a knob gear lever action test for Land Rover by bench.


The tools we need:

MT502

Main Cable

P004 ECU Clone Jumper

P004 Adapter

Lander Rover Gear Lever Control ECU

obdstar-mt502-do-landrover-knob-gear-lever-action-test-1

Procedure:

Choose [Test Platform] >> [GEARLEVER] >> [GEARLEVER LAND ROVER/JAGUAR]

Click [Guide] in the lower left corner, carefully read the development background and operation methods.

obdstar-mt502-do-landrover-knob-gear-lever-action-test-2

obdstar-mt502-do-landrover-knob-gear-lever-action-test-3

There are two methods to choose from:

Method 1:

The wire in terminal 2 of the T006 wiring harness needs to be cut off and you need to install a 12V control switch yourself or reconnect and disconnect both ends of the cut wire when you click start to control the lifting and lowering of the gear lever.


Method 2:

Use a jumper connection. When you click Start, test the gear lever by plugging and unplugging the jumper of the control power terminal (see the wiring diagram for the control power terminal).


Here we are using method 2, connecting with the ECU jumper

We will test the gear lever by plugging and unplugging the jumper from the control power terminals

Click [Pinout] to view a detailed connection diagram.

Find the wiring diagram for the corresponding module and connect the harness according to the wiring diagram.

obdstar-mt502-do-landrover-knob-gear-lever-action-test-4

obdstar-mt502-do-landrover-knob-gear-lever-action-test-5

obdstar-mt502-do-landrover-knob-gear-lever-action-test-6

The control power is disconnected and turn on the ignition switch of P004.

Click [Start] to test.

Plug in the control power supply

Test that the lift-up, knob functions work properly.

obdstar-mt502-do-landrover-knob-gear-lever-action-test-7

obdstar-mt502-do-landrover-knob-gear-lever-action-test-8

obdstar-mt502-do-landrover-knob-gear-lever-action-test-9

Unplug the control power supply

The lift-down function works properly.

obdstar-mt502-do-landrover-knob-gear-lever-action-test-10

obdstar-mt502-do-landrover-knob-gear-lever-action-test-11

For more details please refer to the video below:

Sunday, 31 March 2024

What is the difference between X300 Classic G3 and X300 DP Plus?

Recently, OBDSTAR released a new product: X300 Classic G3. Many people are curious about the difference between this and the X300 DP Plus. This article lists the hardware and functional differences between the two. I hope this information can help you.

x300-classic-g3-vs-x300-dp-plus

From the table above we can see

1. In terms of hardware

X300 Classic G3 has new upgrades, including CPU, battery, memory, etc.

2. In terms of functionality

X300 Classic G3 adds "Marine IMMO", "E-Car IMMO", "Make key", "Unclock Smart key", "ECU unlock", "ECU flasher IMMO" and other functions that X300 DP Plus does not have, but X300 Classic G3 does not have the diagnosis function of the X300 DP Plus.


For more information please contact:

Email: sales@obd2shop.co.uk

TEL&Whatsapp: +86 13983755934


www.obd2shop.co.uk

OBDSTAR V850 Adapter Kit: Solder-Free MQB (5A) Immobilizer Data Reading

OBDSTAR has introduced the new V850 Adapter Kit , an optional adapter kit specially designed for the MQB-48 (5A) Cluster Recalibration funct...